The Most/Recent Articles

Showing posts with label multiboot usb. Show all posts

Daily Blog #249: How to write the Multiboot USB Image to a thumbdrive

How to write the Multiboot USB Image to a thumbdrive

Hello Reader,
            I thought it would be a good idea to post up the video that I asked Kevin Stokes in our lab to make showing how to actually write the Multiboot Image to a thumbdrive. While you could just use a variety of methods, we've found ImageUSB from PassMark to be a reliable tool for it.
I'm planning on having more videos made to be uploaded to the Youtube channel to help understand and explain some of the more difficult topics we go over.

You can download ImageUSB from PassMark here: http://www.osforensics.com/tools/write-usb-images.html

Watch the video below:


Also Read: Daily Blog #248

Daily Blog #248: Adding the WinFE Image to the Multiboot Thumdrive Image (Video)

Adding the WinFE Image to the Multiboot Thumdrive Image (Video)

Hello Reader,
       We've gone through now how to build the WinFE and WinFE Lite images for use in the Multiboot Thumbdrive. What we haven't covered is how to then add that image (or any other bootable image) to our multiboot thumbdrive. So I asked Kevin Stokes in our lab to make a video walking you through this.


Also Read: Daily Blog #247

Daily Blog #247: How to Build WinFE Lite for the USB Multiboot Image

How to Build WinFE Lite for the USB Multiboot Image

Hello Reader,
         Last week we talked about how to build WinFE to put on our Multiboot Thumbdrive. Now let's show a step by step guide to building WinFE light in case you are tight on space or on a system with very little resources.

This is a visual guide to compliment Colin Ramsden’s guidance on building Windows FE Lite.  This is another great, light-weight tool to have around, especially if you’re not comfortable with the Linux environment when booting a device for imaging.

Get the Prerequisites:
11.       Windows 7 computer with 20 GB or more free space.
a.       Disable User Account Control (optional)
b.      32-bit is recommended for supporting older architecture.  64-bit can be used, just be consistent during the build.  These instructions and links will be for 32-bit.
c.       I installed a fresh, new copy of Windows 7 Ultimate SP 1 for this demonstration.
22.       Download Microsoft Windows Automated Installation Kit (WAIK) ISO http://www.microsoft.com/en-us/download/confirmation.aspx?id=5753
33.       Use your favorite ISO mounter or burn the WAIK ISO to disc.  http://static.slysoft.com/SetupVirtualCloneDrive.exe
44.       Windows 7 x86 ISO or Disc
a.       Ultimate or Enterprise
55.       Windows XP Professional SP3 x86 ISO or Disc (Optional)
88.       Programmers Notepad -- http://pnotepad.googlecode.com/files/pn2342350_multilang.exe
a.       Optional, though as Colin notes, you can edit the build to suit your needs.
99.       HFS+ Drivers -- support.apple.com/downloads/DL1443/en_US/BootCamp_3.3.exe
a.       Optional.  However this is can add support for HFS+ volumes.
b.      Might as well include them.  Leaving them out requires editing the batch file.  Aside from not having HFS+ support.
110.   Download the WinFE Lite Full Package – Contains the rest of what you need.  Including the write protect script.  http://www.ramsdens.org.uk/repository/fullpackage/FE_Lite.zip

Now we Begin:
11.       Install WAIK from the ISO or burned Disc, to the default directory:

How to Build WinFE Lite for the USB Multiboot Image - HECF Blog

This is the KB3AIK_EN (WAIK install file) mounted via Virtual CloneDrive.


Simply select Windows AIK Setup to begin installation.


How to Build WinFE Lite for the USB Multiboot Image - HECF Blog


22.       Install Explorer++ and 7-Zip.
33.       Extract files from Windows 7 and XP (Optional) install Discs or ISO
a.       To keep things organized, create four folders to sort the files you will need.  Per Colin’s example, create a “Repository” folder, then within this folder create “Drivers”, “Windows7Files”, “WindowsXPFiles”

How to Build WinFE Lite for the USB Multiboot Image - HECF Blog

b.      Use 7-zip to access the Windows 7 Installation ISO or to access the Disc for Windows 7.

How to Build WinFE Lite for the USB Multiboot Image - HECF Blog

c.       Navigate to “Sources”

d.      Then find “install.wim” within the directory.

How to Build WinFE Lite for the USB Multiboot Image - HECF Blog

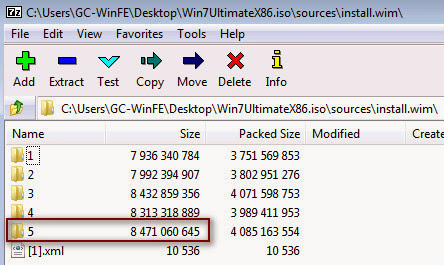
e.      Double clicking “install.wim” inside 7-Zip will open the file to reveal its contents.

How to Build WinFE Lite for the USB Multiboot Image - HECF Blog

f.        Export out the largest folder that appears, to the Window7Files folder created in step 3a.  In this case, folder 5.
g.       Optional – Use 7-Zip to access the Windows XP installation ISO or Disc.  Go into the I386 folder and export files, to the WindowsXPFiles folder, that can add some extra features.  Colin suggests the following list, just double click to find the executable.
                                                               i.      CALC.EX_ (calc.exe)
                                                             ii.      MAG_HOOK.DL_ (mag_hook.dll)
                                                            iii.      MAGNIFY.EX_ (magnify.exe)
                                                           iv.      MSPAINT.EX_ (mspaint.exe)
                                                             v.      MSSWCH.DL_ (msswch.dll)
                                                           vi.      MSTSC.EX_ (mstsc.exe)
                                                          vii.      MSTSCAX.DL_ (mstscax.dll)
                                                        viii.      OSK.EX_ (osk.exe)


h.      Optional – Use 7-Zip to extract drivers for HFS+ support by navigating to the “BootCamp_3.3.exe” file downloaded from step 9 of the prerequisites.  Right-click on the file and select “Open Inside”.  Now double-click entries in this order:

How to Build WinFE Lite for the USB Multiboot Image - HECF Blog

                                                               i.      .rsrc
                                                             ii.      0
                                                            iii.      MSP_RESOURCE
                                                           iv.      UPDATE32
                                                             v.      PCW_CAB_BootCamp
There are two files here to extract.  “AppleHFS.sys” and “AppleMNT.sys” Place these in the “Drivers” created in Step 3a.

How to Build WinFE Lite for the USB Multiboot Image - HECF Blog

44.       Extract the WinFE full package from step 10 in the prerequisites to the location of your choice.  I choose simply under the C: drive.  Do not alter the names of the files and directories extracted from the package, as they are needed for the batch script we will be using.

Let’s Build it:
Here is a little information about the folders from the extracted FE_Lite directory.
ISO – This is where our built ISO will be output. 
X – User files can be added to this folder and sub-directories
Other folders – used in the build process
Where to copy files:
\X\Windows\System32
ExplorerFrame.dll            (From \Repository\Windows7Files\5\Windows\System32)
calc.exe                                                (From \Repository\WindowsXPFiles)
mag_hook.dll                    (From \Repository\WindowsXPFiles)
magnify.exe                       (From \Repository\WindowsXPFiles)
mspaint.exe                       (From \Repository\WindowsXPFiles)
msswch.dll                          (From \Repository\WindowsXPFiles)
mstsc.exe                           (From \Repository\WindowsXPFiles)
mstscax.dll                          (From \Repository\WindowsXPFiles)
osk.exe                                (From \Repository\WindowsXPFiles)
Explorer.exe                      (Renamed from Explorer++ which was downloaded earlier)

 
How to Build WinFE Lite for the USB Multiboot Image - HECF Blog


This is how the “\X\Windows\System32” directory should look now (assuming you show extensions, of course).  Updates to WProtect.exe (used for Write Protection and mounting) can be added to this folder prior to a rebuild.  Also you can adjust the wallpaper for the build by including a BMP file of choice named “winpe.bmp”
\X\Windows\System32\Drivers

         
How to Build WinFE Lite for the USB Multiboot Image - HECF Blog
      
AppleHFS.sys
                AppleMNT.sys

Press the button!
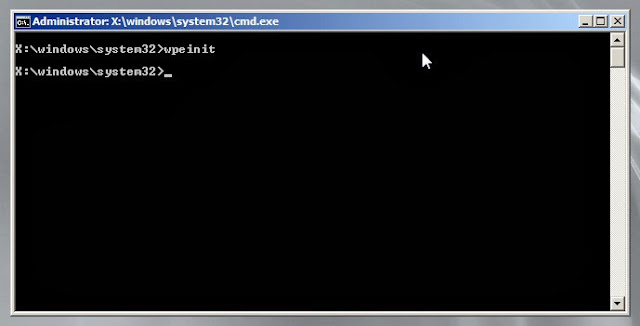
Open a command prompt and run the MakeFELite.bat file.  There will be a lot of information scrolling on the screen as it goes through the batch file.  Then it will be done.

How to Build WinFE Lite for the USB Multiboot Image - HECF Blog


You can copy the resulting image to a CD or thumbdrive, or just load it into a VM to check it out.  But this will give you a command prompt to play around in.  Add other tools and rebuild to you hearts desire.

How to Build WinFE Lite for the USB Multiboot Image - HECF Blog

Daily Blog #242: How to build WinFe to add to the Multiboot Thumbdrive

How to build WinFe to add to the Multiboot Thumbdrive

Hello Reader,
           If you've played around with our Multiboot Thumbdrive image you've no doubt thought about expanding it to make it even more awesome! One of those boot images we'd like to offer prebuilt is WinFE but licensing restrictions prevent us from doing that. So we decided to go put up our tested instructions written by Kevin Stokes in our office for getting WinFE built and loaded on to the Multiboot Thumbdrive. Next week I'll be posting Kevin's write up on building WinFE Lite as well.

Prerequisites:
1.       Create a Folder called “WinBuilder” at the root directory.  So “C:\WinBuilder”
2.       Download WinBuilder -- http://reboot.pro/files/file/4-winbuilder/
a.       Place this file in the WinBuilder file created in Step 1.
b.      Once executed, a “Projects” folder will be created, as well as “WinBuilder.ini”
3.       Download and extract the WinBuilder Write Protect Script -- http://www.ramsdens.org.uk/repository/winbuilder/WP.zip
4.       VMWare Player (Optional for testing, but you should test!) -- http://www.filehippo.com/download_vmware_player/download/9ec2395bb8eecf20e1295355adb2dc23/
5.       Window 7 install DVD – I used Win 7 Ultimate
a.       32 bit is recommended for compatibility with older systems.
b.      Make a folder, in the WinBuilder folder, called “WindowsDVD” and copy the contents of the DVD to this directory (Optional, to save some time later)
c.       Alternatively, use an ISO of the install DVD and mount it with an ISO mounter.  This is my method of choice.  I used Elaborate Bytes Virtual CloneDrive.

How to build WinFe to add to the Multiboot Thumbdrive


Set up Winbuilder:

How to build WinFe to add to the Multiboot Thumbdrive


Once Winbuilder is running, you will need to download the project “Win7pese.cwcodes.net”.  The name could be changed, so If you’re unsure which project to get, select it, then select the main Project folder in the left pane to read the description of the project in the right pane.  You may leave out some languages if you wish, English is not listed since that is the default.  It is safe to leave something checked if you’re unsure of what it does.  You’re just downloading at this time, not building.  Once you’re sure of what to get, press the “Download” button at the bottom of the left pane.

There are several things to consider at this point.  For this discussion, I’ll keep things pretty minimal:
11.       We should now manually add the write protect script we downloaded to the materials WinBuilder downloaded for us.  Navigate to “C:\Projects\Win7PESE\Tweaks” and add the script directly to this folder.  Now close WinBuilder and re-open it.  There should be an entry in the Tweaks folder for the script.  It will likely be in a separate Tweaks folder, which is okay.  Make sure it is checked.

How to build WinFe to add to the Multiboot Thumbdrive

22.       Now select, “Images configuration” in the left pane.  Here you will set up:
a.       Check “Always use WIMMount Driver” 
As it mentions, this process can be slow, as it will be reading from the DVD or DVD image.  However, if you have mounted the ISO of the DVD or made a copy of the information from the DVD to the “WindowsDVD” directory as mentioned in the prerequisites, which will speed it up some.
b.      Check “Show Wim Tools progress”

How to build WinFe to add to the Multiboot Thumbdrive

33.       If you have copied the DVD contents to “WindowDVD”, select the Sources button, then show WinBuilder where the “Source directory” is for the Windows 7 DVD folder. 
a.       If you are mounting an ISO of the DVD, then simply point to its drive letter.


44.        (Optional) In the left pane, expand the listing for “VirtualTest”.  This will allow WinBuilder to open up the newly created image VMWare Player (if you installed it) to test it.  Feel free to try other selections.

How to build WinFe to add to the Multiboot Thumbdrive

55.       (Optional)  Go through the listings and make other adjustments that you would like.  Below, I made an addition to this walk-through to mention a few things I changed in my final version.  Keep in mind, however, that building can be a delicate process that can take many attempts to get right.  The more you add, the bigger your build and the better chance for errors.  If you come across a system without much RAM, it could be bulky and slow or not run.  I prefer to keep it simple and add extra utilities to another thumb drive, which can be mounted after booting into WinFE.
a.       WinBuilder will halt on errors.  Though it does keep logs of the activity and will show you where a problem occurred.  I would advise running it first with this basic build to see what it should do, then slowing adding features that you like. It would make troubleshooting much easier. 
66.       Now you’re ready to build!  Just select the “Play” button at the top of the window.
a.       If you get errors, you may have to make adjustments. After you make adjustment, go to the “Main Configuration” link and select “Clean Temporary files”.  This will clean out actions in the Temp folder from the previous build attempt. 

How to build WinFe to add to the Multiboot Thumbdrive

b.      The ISO will be automatically named “Win7PE_x86.ISO”, if you followed this guide.  I will rename mine to “Win7FE_x86.ISO” so I don’t confused it later on.
c.       Here is what the boot screen will look like.

How to build WinFe to add to the Multiboot Thumbdrive

d.      After loading Win7PESE, the Write Protect tool will start.

How to build WinFe to add to the Multiboot Thumbdrive

e.      Set up the Write Protect functions, add drivers, and get other disk information.

How to build WinFe to add to the Multiboot Thumbdrive

f.        After you select continue, WinFE loads up


How to build WinFe to add to the Multiboot Thumbdrive


Adjustments I made:
11.       When booting there is only a 5 second timeout for the boot screen.  It does boot into WinFE by default, but I prefer to control the actions at boot.  I did not find a good way to manage the timer through WinBuilder, however.  So, I opted to edit the boot options manually.  Here is what you can do this with.
a.       Download WinISO and install -- http://www.winiso.com/user/download/winiso.exe
b.      Open WinISO, select “Open File”, navigate to the path for your new ISO (c:\WinBuilder\ISO\), and select “Win7FE_x86.ISO”
c.       Select WIN7PESE (with the ISO icon next to it), in the left pan
d.      In the File List pane, right-click “MENU.LST” and select Extract, save in a place you are familiar with. Leave WinISO running.
e.      In Notepad, or another editor, open MENU.LST.  Delete the line “timeout 5”, or you can adjust the 5 to something longer like 20.  Whatever you like.  Deleting the line will disable the timer.
f.        Go back to WinISO, delete or rename the original MENU.LST, select “Add Files”, and add the new MENU.LST that you edited.
g.       Once added, select the “Save” button and confirm overwriting.
h.      Now you can test it in VMWare Player to make sure it is working properly.
i.         ** You can likely add standalone apps using this tool, but I have not done this.  I prefer to keep this simple and use standalone tools in another location.
22.       You can change the Wallpaper using WinBuilder.  The script is in the Tweaks folder.
33.       An IE 8 script is available in WinBuilder, in the Components folder.  Though after trying this out, I opted to get the portableapps version of Firefox to run from a separate source.
44.       There is a Drivers folder in WinBuilder that would allow for extra support.  USB 3.0 Support can be handy.  Add drivers as needed

Multiboot:

The final version of my WinFE image was added to a 32GB multiboot/multipartition thumb drive that I created for adding to a forensic go bag.  Check out David Cowen’s Daily Blog #228 for details to download this thumb drive image and get it up and running.


Here is some information to make your own multiboot thumb drive: 

Expect a video next week showing how to add this to the Multiboot Thumdrive.