Hello Reader,
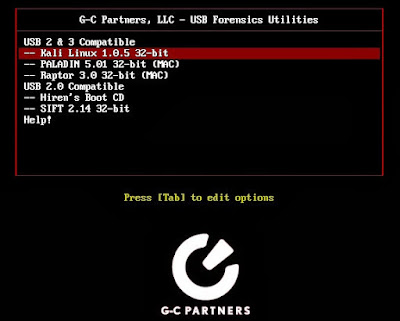
If you watched the forensic lunch last week you would have seen us demonstrate a multi boot USB key we've made. While we work out any potential licensing or permission we need to receive before we distribute someones work I thought it would be helpful to explain how we did it, so you can do it as well. So here is what Kevin Stokes in our lab wrote up:
If you watched the forensic lunch last week you would have seen us demonstrate a multi boot USB key we've made. While we work out any potential licensing or permission we need to receive before we distribute someones work I thought it would be helpful to explain how we did it, so you can do it as well. So here is what Kevin Stokes in our lab wrote up:
In this walk-through, I’ll show you how to create a multi-boot USB drive to carry lots of great DFIR tools, or whatever else you want.
We started with a USB 3.0 32GB thumb drive. They are very cheap now-a-days. You can use a smaller drive. We actually still have a lot of extra space, but that does leave plenty of room for add-ons later.
To keep the tool compatible with older systems, we used FAT32 and added several distros of linux to cover many situations and configurations. Some of the distros will boot on USB 3 and some will not, however, they will all boot from USB 2. Here are the distros we are using:
- SIFT 2.14
- Kali Linux
- Paladin 5
- Raptor 3
These will give a lot of compatibility with multiple systems and many tools for multiple situations. Paladin and Raptor will even boot on MAC systems. Feel free to add your favorite!To make this tool even more versatile, we will add a second FAT32 partition for any other tools we wanted to have available. Such as tools for Windows systems like the SysInternals Suite, FTK Imager Lite, among many others.You can partition it with whatever tool you find that will partition removable drives. I chose EaseUS Partition Master Free Edition, which has been pretty easy. It is recommended that you make all your partitions Primary, however. As apparently Windows will only look at the first Primary partition on a removable drive. We can use another program called RMPrepUSB to switch the order of the active partitions (Ctrl-O) so we can manipulate each partition individually. RMPrepUSB will do many of the other steps we need, too. However, I found the other tools more intuitive. Though I did not find another tool that would swap the order of the partitions, which we will need.Once you have the thumb drive partitioned how you like, use XBoot to create the multi-boot partition. When you add the ISO file to XBoot, select “ISO files which support Live-media-path kernel parameter”.Then add as many distros as you would like, in this manner. Once you have all your distros added, you can select “Create USB”, a pop-up will appear to select the USB drive (make sure you get the right one!). Syslinux bootloader is recommended for FAT32. Select “OK”, then it will begin to create your bootable partition and add the distros you selected. Be sure to test this out! You can use the QEMU to test.It’s not difficult to edit the menu, just grab a text editor and make adjustments to the right .cfg files. For the image, I merely edited the default xboot.jpg image. It’s a fun way to further customize your toolkit. Add some extra information to assist you in choosing the right tool for the job. For example, so far in my testing only Paladin and Raptor would boot on a MacMini here in the lab. So I added information to save time and trouble later.To add tools to the second partition, use RMPrepUSB tool (option Ctrl-O), to switch the partition that windows is showing you.At this point, you have access to the non-boot partition, then just add whatever you would like. There are many portable apps available. I’d recommend, considering forensic use of this device, that you create a separate folder for any programs that require installation or just leave them out.To keep the drive bootable and to always have access to the non-boot partition in Windows, make sure once you have finalized your customizations that you have the non-boot partition set as the first Primary partition. That way Windows will always find it. The computer will still see the boot partition when you’re booting from the thumbdrive, assuming you have the bios setup right.
Also Read: Daily Blog #206 - Download our Multi Boot USB Drive


Post a Comment