Hello Reader,
Short one today, we've updated our USB Multiboot image to get it into compliance with some of the tools we included last time (they did not allow redistribution outside their own site) as well as adding Kali Linux!
You can download the updated image here: https://mega.co.nz/#!i45WhQya!SQILk0Td3e-g2j9YKUtuFjkbrrszJAgWthfhkGOKpqk
Here's the hash of the image: 0CE2DF92EA14A151F17D553AFA8ED58A
To extract the image to one of your USB drives we use ImageUSB from Passmark: http://www.osforensics.com/tools/write-usb-images.html it's free!
Here is how to restore the image to a new 32GB or larger Thumbdrive:
Step 1. Download the zip file, it's 6GB.
Step 2. Extract it somewhere were you have at least 32GBs of space.
Step 3. Download and instal the ImageUSB software linked above.
Step 4. Insert a 32GB or greater thumb drive, all the contents of it are about to be overwritten so make sure you don't want that data!
Step 5. Run the ImageUSB program.
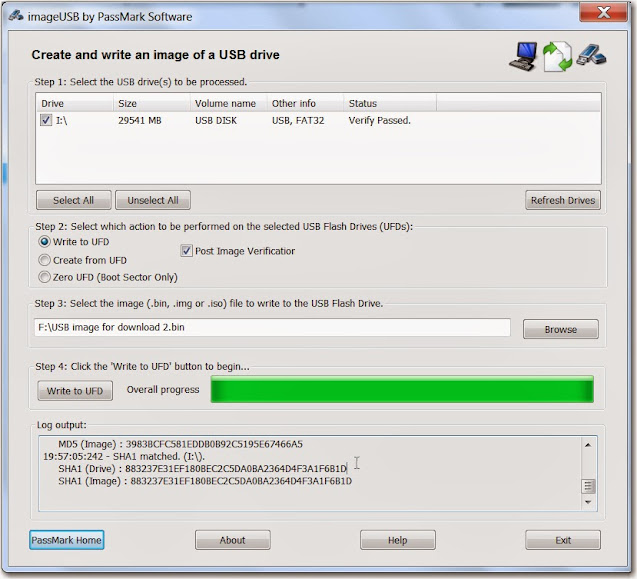
Step 6.Next you'll see the following screen you'll need to do the following:
a. select the drive letter you want to write the image to, in the examples below I picked I:\
b. Make sure 'Write to UFD is selected'.
c. Provide the full path to where the .bin file you extracted in Step 2 now exists, you can see for me it's on f:\usb image for download 2.bin.
d. Click on Write to UFD.
We've included some base utilities and cheat sheets but its up to you to download more and place it on there as many tools have restrictions in their redistribution. I would recommend atleast downloading all the sysinternals tools
If you want to see the multiboot work all you need to do now is reboot your computer with the thumbdrive left plugged in!
Good luck!


Post a Comment